WIP Portfolio Site Is Online!


I’ve had a bit of a go at web design and have put everything I’ve managed to conjure up online here at suzikagi.co.uk. The site is just a holding place for recent projects worth showing off, and can be used as my main portfolio from now on.

Check it out now and in future, as the whole thing is a work in progress and still needs a little work, not to mention the addition of a few missing images… I’ll be putting major updates there about ongoing projects too, like some of the changes I’ve been making to the new and improved version of Hanami (more about that later!)

Thanks to everyone who has helped me along through the Hanami project so far and to those who have taken the time to read any of this blog. You’re awesome.

Download Hanami Beta Now!

The Hanami Beta is now available to download from the Yoyo Games Sandbox website! Because the game won’t scale to account for various screen resolutions, I’ve created a fixed windowed version of the game which sits in a 960×570 window. Compared to the footage and images I’ve been showing so far, this version reduces the amount that is visible on the screen at once. I actually prefer this limited field of vision as the screen looks a lot less cluttered, although it does potentially make the game harder and much easier to get lost!

The sites requires info and images to create a dedicated page for the game. I took some screenshots from the new windowed version of the game to upload:


The zipped folder available by clicking on the download game link consists of a folder containing:

Folder of box art images
The empty save folder
Folder of game sounds
The game (windows executable)
PDF instruction manual
Readme text file
Supersound.dll (required to play sounds in game)


The game currently appears in the Beta type section of the site in the Platform genre. After the project is over I would love to continue working on and improving the game. I’ve already had some really helpful feedback and have started thinking of ideas for positive changes. Hopefully I can get some more feedback from the Yoyo Games site.


You can see the game’s download page by clicking on the link below!

YoYoGames

1

Hanami
Added: 12 May 2012
By: Hana Mi

Let’s Play Hanami

This video shows a complete run-through of the game, and every item collected. Details are explained with game dialogue style commentary on the way.

While the game is currently in a state where it can be played from beginning to end, it’s not necessarily a finished piece. You will notice a couple of glitches and problems, including:

at 10:33: The man who could walk through walls…
But didn’t get too far. I’m still unsure as to the cause of this problem. The character object is used in all of the first three levels, but only encounters this problem here. I’ve put plenty of measures in place to stop the problem from happening, but haven’t found the solution yet. If I can’t work it out before next week, then I will try to relocate the character and hope that this solves everything.

at 14:24: Some fairly poor level design.
The solution to this problem is to take away some of the walls and ceiling to simply provide the player with enough room to actually jump into the space, without loosing a whole lot of health along the way.

at 23:13: A positioning problem
Probably related to bad maths or bad coding. The kokeshi doll should appear in the centre of the screen like every other item when it is collected, but I may have accidentally programmed it to appear above the player. This just doesn’t look right at all, but is an easy problem to fix.

at 24:49: A score positioning problem
Again, not entirely sure about the cause of this problem. When the new game+ begins, the score shifts slightly to the left. You can hardly see it above the blossom icon, but it’s there. It slyly moves back to its proper place when the inventory is opened, it seems. Not sure how I’m going to solve this one.

Please leave comments/suggestions on anything else you notice, and I will fix everything up for a beta release.

Estimated Time Remaining:

One week.

It took a few practice runs to get a get a good play-through video of Hanami, but I’ve got a pretty decent run to show. It took me 26 minutes to play from beginning to end, and the original compressed file size was 45GB! Even at this size, the capture lacked a lot of pixelated sharpness, and the smoothness of the light gradients. However, recording an uncompressed file was completely out of the question. I’ve reduced the file size to just 376MB, and the quality is more or less unchanged.

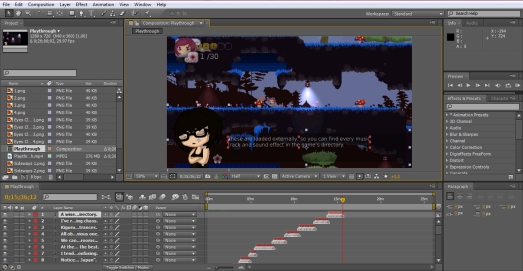
To accompany the video, I’ve worked out a subtitle system to provide a running commentary of my thoughts whilst watching the video back. This commentary contains technical info, inspiration and a few pointless facts about the game that pretty much sum up its development. The subtitles take the form of a typical JRPG dialogue. I’ve drawn several self-portraits of myself pulling various facial expressions to sit next to the subtitle text box:


These portraits sit in the bottom left corner of the video, as this seems to be the place where there is least important content. Text is then written in the box to the right of the portrait.


I’ve used the typewriter animation preset in After Effects to make the text scroll in letter by letter, as it tends to do in video game dialogue. This makes it easier and quicker to read than a huge block of text that appears all at once. I’ve added each portrait image to the video’s timeline individually, and used the opacity settings to define which image is shown at which point in the video.


The actual text is contained in just a few rows on the timeline. I downloaded a script which allows you to import large chunks of text into After Effects and break it up into single lines based on where the line has been dropped. This expression goes in the source text parameter of the text layer:

type = text.sourceText;

m = thisLayer.marker.nearestKey(time);
sentences = type.split(“\r”);
n = m.index;
if (time =sentences.length){n=sentences.length-1}

if (n<1){n=1}
line = sentences[n];

line

You can find details on how it works here. Layer markers act as keyframes to switch between each line. I’ve then set and reset the typewriter start value to type in each line.


I’ve currently added about 15 minutes of commentary, with an appropriate facial expression for each line.

Everything A Game Should Have

Before recording the final playthrough video, I’ve played through the entire game myself to make sure everything works and to work out an effective route to follow so that I can show every blossom being obtained. This was also the best way to see if the jump to the ending slides worked, which as it turned out it didn’t! So I’ve fixed that, and added one more very final slide that shows the kanji for “owari”, meaning “end”.


To wrap the game up for testing, I’ve added a few finished touches. I’ve replaced the default Game Maker loading screen with a horizontal version of the game’s logo. The main reason I’ve decided to align the logo horizontally this one time only is because it sits better on the monitor. This is shown when the game is initially opened up.


In this screenshot you can also see the Hanami blossom icon in the task bar along the bottom. This is the same as the game icon, although because it’s bigger it hasn’t actually scaled very well. I’ll be sure to scale it properly myself before converting it to a 32×32 pixel .ico file!

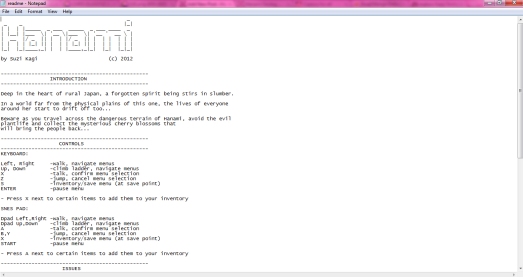
The last addition I’ve made is a readme and help file which will come in the game folder. I had fun creating the typography in the readme text file, inspired by the likes of Spelunky and Ninja Senki! The file is a basic and quick look at some game info including controls, although a pdf version of the game manual will also be available.


The game’s help file is the same as this but unfortunately without the bubbly title. This is brought up in game by pressing the F1 key.

The Realms Of Shadow…

Warning! This post contains the indecent exposure of pixel people…

Last week I proposed the idea of shadow NPCs, stating that:

If I try this and it makes sense, then I’m putting it in.

The first step to experimenting with this idea was to come up with a bunch of generic-looking non-playable characters, and being the resourceful and efficient person that I am, I’ve based these character on structures of my existing characters. With a little adjustment and the removal of clothes, I had the perfect template for a gathering of normal people! You can probably recognise features in the line up below.

I’ve balanced out the gender gap a little but transforming a couple of my previously male characters into female ones, so my new NPC characters currently exist of four women and five men. To increase the amount of available characters even more, I’ve created nine outfits per gender, which with a mix and match process increases the amount of available women combinations to 36 and the men to 45.

Women’s outfits:

Men’s outfits:

What concerned me original was how I was going to all the different character variations into the game, without having to make each one of the 81 possibilities and importing them as sprites. The solution I came up with actually uses a very minimal amount of code to select a random head and set of clothing and draw this onto a set body shape. I took each individual head and set of clothes and made a single sprite for each of these categories:


Each sprite is made up of several sub-images which consist of the combination possibilities. These come on various shapes and sizes, so it was really important to make sure they align through the images origin.


I then made two objects called obj_npc_male and obj_npc_female. In the create event for each of these, I placed this code:


Here, I’ve set up two custom variables called “head” and “clothes”. Where these variables are involved, a number between the range shown will be selected at random. In this case, these numbers refer to the sub-image of a particular sprite. Next, I’ve used this code in each object’s draw event:


The code in brackets represent sprite, sub-image, x value and y value. The first line of code draws the body sprite, which only had one sub-image so I’ve used 0 here. I haven’t had to worry about x and y values, as I’ve determined this with the sprites’ origin alignment, so they simply remain “x” and “y”. The second line of code draws the head sprite. Instead of giving sub-image a numerical value, I’ve written head, which will refer back to the original code and pick a different number for each instance. I’ve done the same thing for the clothing sprite.

I made a temporary room to test these sprites in. I placed four of each object in a line and ran the game three times. Each time, the characters were drawn at random! Here were my results:

Try 1:

Try 2:

Try 3:

The main negative point about this system is that because it is random, similarities between characters seem to occur more often than I would like, but on the positive side I’ve used minimal resources and code to create a working random NPC generator! However, according to my original plan, they only need to look this way after they have been saved at the end of the game. In order to create a silhouette style version of each, I’ve used the more complex command draw_sprite_ext to determine temporary opacity and colour. Whether the game has been finished or not depicts whether the global variable global.kokeshi is true or false, so I’ve used this to determine whether or not the character is “complete” or in shadow form:


The values in draw_sprite_ext show (in order): sprite, sub-image, x value, y value, x-scale, y-scale, rotation, colour, alpha value. When the game has yet to be finished and global.kokeshi=false, the sprites are drawn in black with a slight drop in opacity, which makes them look like shadowy silhouettes. Then when the game has been finished once the characters are drawn in full. Unfortunately, using this system there is little I can do to get a lot of movement into the characters, so at the moment they are very static. Here’s a look:

Creepy shadows hanging around the cafe…

A lovely afternoon of tea ^_^

No Closure. Not Yet.


The game will have fully reached beta stage by the end of this week, and I hope to start recording a final playthrough video and shorter “trailer” video that can be shown on the internet/at the critique in a couple of weeks time. I apologise for the lack of videos I’ve posted towards the end of the project, but I’ve had yet more problems with codec compatibility with the Vcap dll I had been using for a while. I’ve got time now, so I’m going to sort out the problem once and for all.

Things are gradually getting crossed of my to do list, and I’m trying to do things in an order of priority. Today I drew up that last two “slides” for the game’s perfect ending, so there’s now very little that I actually need to make or add. These final images don’t really provide closure, because I think if the player has struggled through finding every single blossom throughout the game then the last thing they’ll want is a simple “…and everyone lived happily ever after.” The intention was that the player gets this from the regular ending.


This time, Hana returns to the shrine where she placed the Kokeshi doll only to find that the doll and the cherry blossoms are missing. This could lead to two opposite conclusions- either the mischievous spirit has escaped and will continue to wreak havoc, or she has gone away and left the world to get on with life without disturbance. I haven’t really placed any clues as to which one it is, I think the player can decide this for themselves.


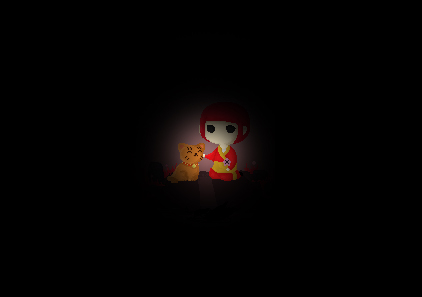
The next slide could be the decider, however. This shows Zashiki Warashi next to the Maneki Neko. I personally intended this image to look as though the spirit has given into her childish nature and taken on the more playful characteristics of a child, but again this is up to the player to decide. It’s a good or bad ending, but either way, the game ends here and there is nothing more to do.

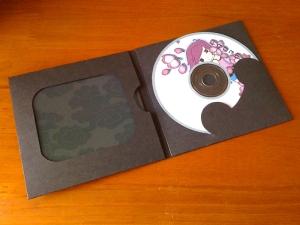
I’ve also been busy finishing a full-scale mock-up prototype of my packaging design, which I’m happy to say works very well. For the mock-up, I’ve used thin black cardboard for the case, which I’ve painstakingly measured and cut by hand to make sure all the dimensions add up. The manual is printed onto glossy photo paper, which is a bit thick for its purpose but gives it a nice shiny finish! I’ve only printed the cover for now, which actually ended up going a little wrong as I forgot to print the logo onto the back. In the photos I’ve used the manual cover for the box cover, which just means you get the words “instruction manual” on the front of the box. I printed the disc art onto normal printer paper and stuck it onto the CD with paper glue!